In-person payments
Choose your scenario based on your point of sale setup:
- Customer-facing screen - You have a screen where you can display a dynamic QR code
- QR scanner - You have a scanner to read the customer's personal QR code
- POS - manual entry - You have a manned point of sale where the cashier enters the phone number
- Static QR - You have an unmanned point of sale like a vending machine or trust shop
- Customer-facing screen ⭐
- QR scanner
- POS-manual entry
- Static QR
Displaying one-time payment QRs
You have a screen at checkout that faces the customer (like a tablet, monitor, or payment terminal display).
You generate and display a unique QR code for each transaction. The customer scans it with their Vipps MobilePay app to pay.
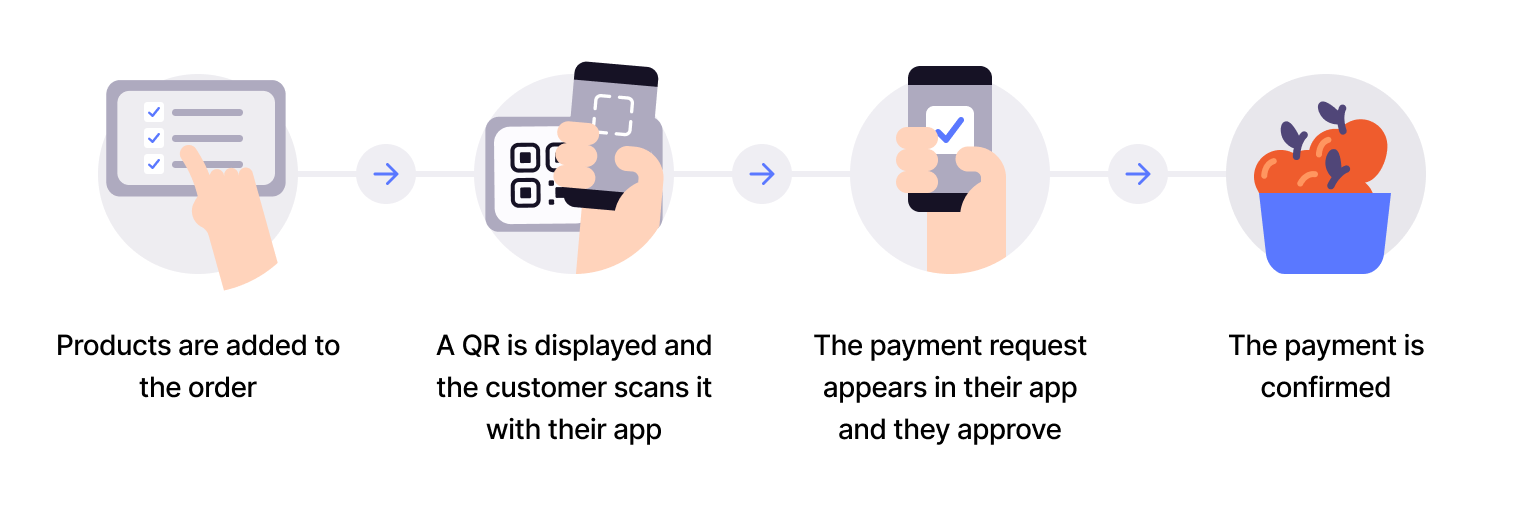
Flow diagram: 4-step dynamic QR payment process. (1) Products are added to the order. (2) A QR code is displayed and the customer scans it with their app. (3) The payment request appears in the app and the customer approves it. (4) The payment is confirmed.
-
Generate QR - Create a dynamic QR code and payment request via ePayment API (details).
-
Display QR - Show the QR code on the customer-facing screen.
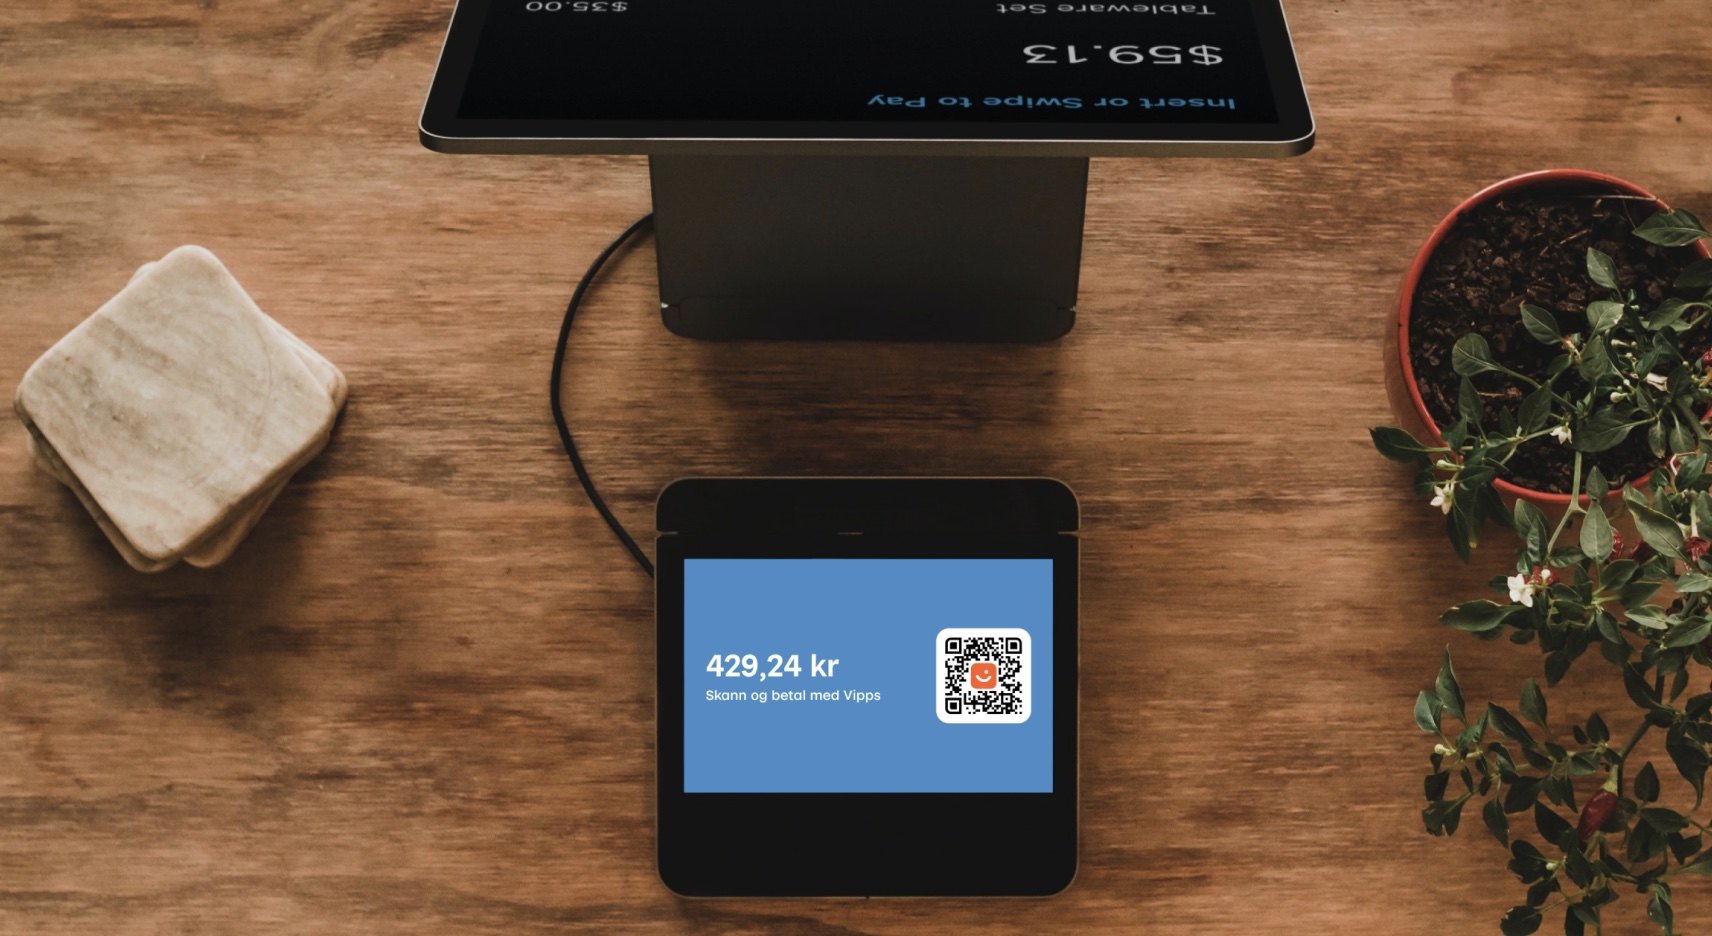
Photo: A POS terminal customer-facing screen showing a QR code and the amount 429.24 kr with the text "Scan and pay with Vipps".
-
Customer scans and authorizes - Customer scans QR and approves payment in their app.
-
Capture payment - Confirm the transaction is complete.
View sequence diagram
Dynamic QR directing to the app
- Merchant generates a dynamic QR code and payment request via the ePayment API.
- Merchant displays the one-time QR code to the customer.
- Customer scans the QR code and selects to pay.
- Webhooks API sends the merchant a webhook with the payment authorization status.
- Merchant captures the payment via the ePayment API.
- ePayment API returns the status of the capture.
- Merchant verifies that the POS status matches the capture.
Scanning the customer's personal QR code
You have a QR scanner at your checkout (the kind that can scan codes from a phone screen).
The customer opens their personal QR code in the Vipps MobilePay app, you scan it to identify them, then send the payment request to their app.
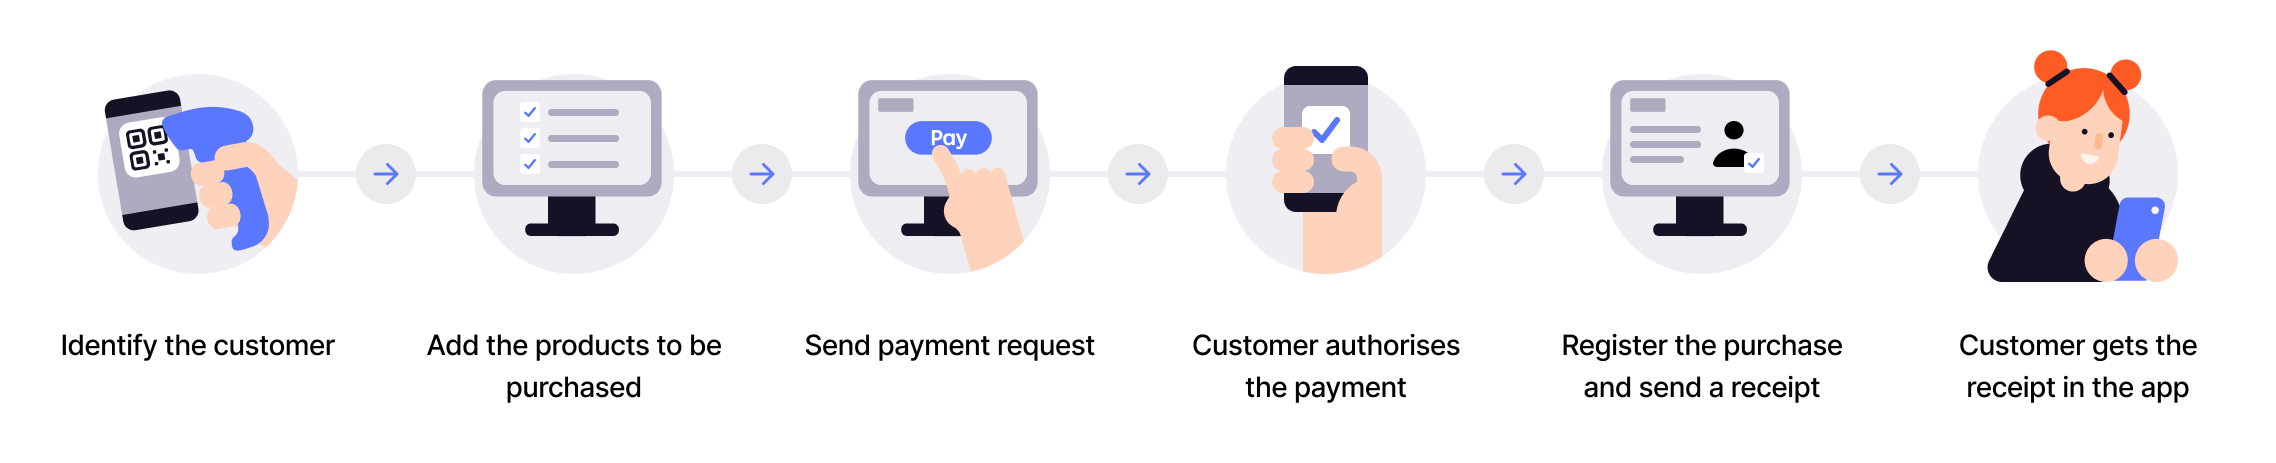
Flow diagram: 6-step in-store payment process. (1) Identify the customer (scan their personal QR). (2) Add the products to be purchased. (3) Send payment request. (4) Customer authorizes the payment. (5) Register the purchase and send a receipt. (6) Customer gets the receipt in the app.
- Register products - Add items to the POS system.
- Scan customer's QR - Scan their personal QR code to identify the customer.
- Send payment request - Initiate payment using the ePayment API with
PUSH_MESSAGE. - Customer authorizes - Customer approves payment in their app.
- Capture payment - Confirm the transaction is complete.
View sequence diagram
QR scanner payment flow
- Customer shows their personal QR code to the merchant.
- Merchant exchanges the scanned QR code for the customer ID via the QR API.
- Merchant adds products to the sale.
- Merchant initiates a payment request with receipt via the ePayment API.
- ePayment API requests payment from the customer.
- Customer clicks pay.
- Webhooks API sends the merchant a webhook with the payment authorization status.
- Merchant captures the payment via the ePayment API.
- ePayment API returns the status of the capture.
- Merchant verifies that the POS status matches the capture.
Entering the phone number manually
You have a manned checkout where cashiers can enter information manually.
The cashier asks for the customer's phone number, enters it into your POS system, then sends the payment request to their Vipps MobilePay app.
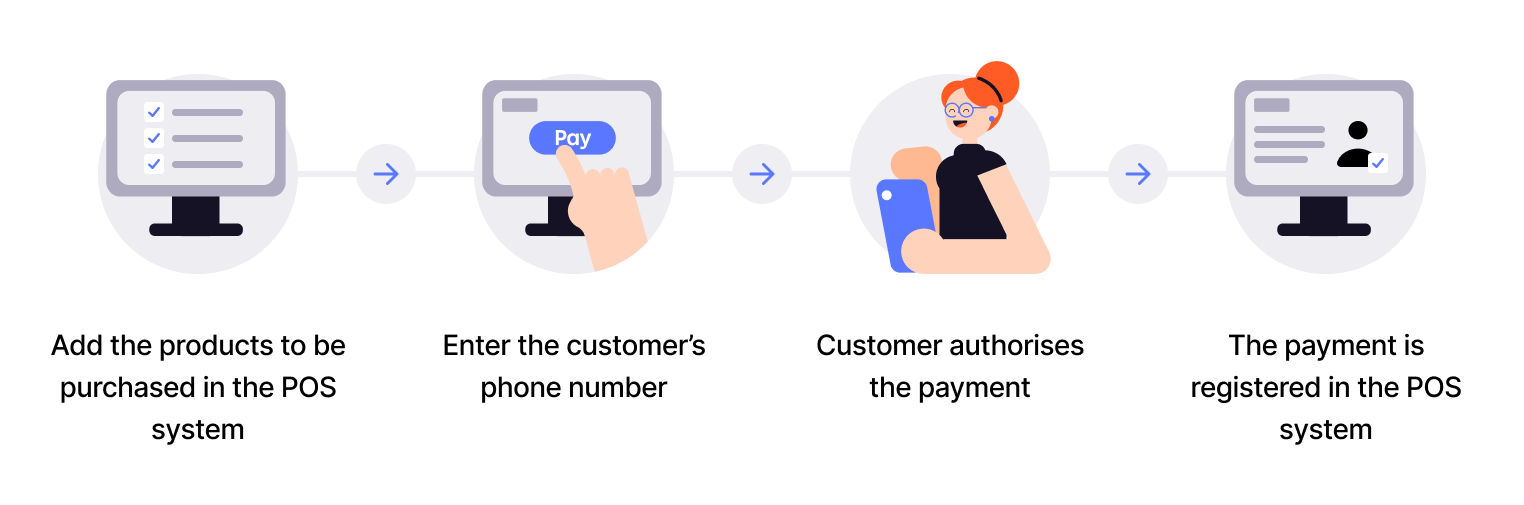
Flow diagram: 4-step in-store ePayment process. (1) Add the products to be purchased in the POS system. (2) Enter the customer's phone number. (3) Customer authorizes the payment. (4) The payment is registered in the POS system.
- Register products - Add items to the POS system.
- Get customer phone - Manually enter the customer's phone number.
- Send payment request - Use the ePayment API to initiate payment with
PUSH_MESSAGE. - Customer authorizes - Customer approves payment in their app.
- Register payment - Update the POS system with payment status.
- Capture payment - Confirm the transaction is complete.
View sequence diagram
POS manual entry payment flow
- Customer provides their phone number to the merchant.
- Merchant adds products to the sale.
- Merchant initiates a payment request with receipt via the ePayment API.
- ePayment API requests payment from the customer.
- Customer clicks pay.
- Webhooks API sends the merchant a webhook with the payment authorization status.
- Merchant captures the payment via the ePayment API.
- ePayment API returns the status of the capture.
- Merchant verifies that the POS status matches the capture.
Using static QRs
You have an unmanned location (like a vending machine, trust shop, or self-service kiosk) with no special hardware.
Choose between two types of static QR codes:
Merchant Callback QR
Display a printable static QR code that sends a callback to your system when scanned. Best for self-checkout, vending machines, or unmanned locations where you need to know when a customer is ready to pay.
When scanned with the Vipps MobilePay app, you receive a customer token via webhook. You then initiate a payment that reserves the price of the most expensive item, customer makes their selection, and you capture only the actual amount.
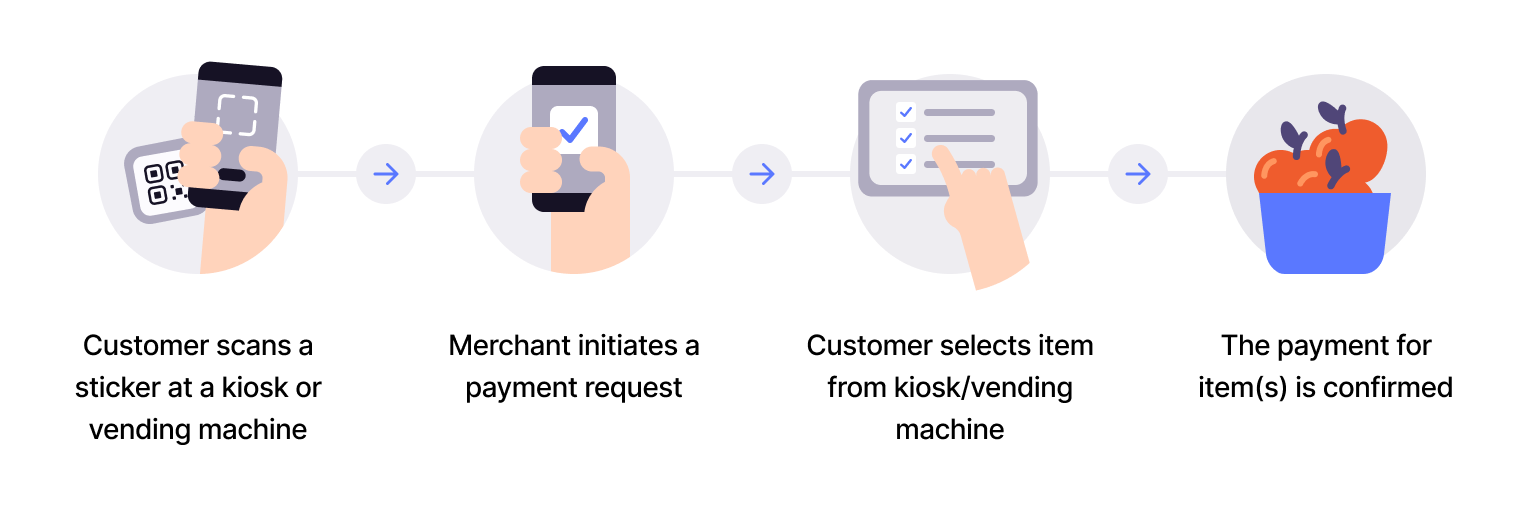
Flow diagram: 4-step QR direct-to-app payment process. (1) Customer scans a sticker at a kiosk or vending machine. (2) Merchant initiates a payment request. (3) Customer selects item from kiosk/vending machine. (4) The payment for the item(s) is confirmed.
- Generate QR - Create a static QR code and display it near the checkout.
- Customer scans QR - Customer scans the static QR code with the Vipps MobilePay app.
- Callback received - Your system receives a webhook notification with a customer token.
- Initiate payment - Send payment request for the most expensive item's price via ePayment API.
- Customer authorizes - Customer approves the payment in their app.
- Customer selects product - Customer makes their selection on the vending machine.
- Partial capture - Capture only the actual amount for the selected product.
- Cancel remaining - Release the remaining authorized amount.
View sequence diagram
Static QR directing to the Vipps MobilePay app
- Merchant creates a Merchant Callback QR code via the QR API.
- Customer scans the QR code.
- Webhooks API notifies the merchant of the scan.
- Merchant adds the product to the sale.
- Merchant initiates a payment request with order details via the ePayment API.
- ePayment API requests payment from the customer.
- Customer clicks pay.
- Webhooks API sends the merchant a webhook with the payment authorization status.
- Merchant captures the amount due via the ePayment API.
- ePayment API returns the status of the capture.
- Merchant cancels the remaining reserved amount (releases it) via the ePayment API.
Merchant Redirect QR
Display a printable static QR code that redirects customers to your website when scanned. Works with any phone camera - the Vipps MobilePay app is not required. The QR never expires.
Use this when you want to direct customers to your website for product selection and payment.
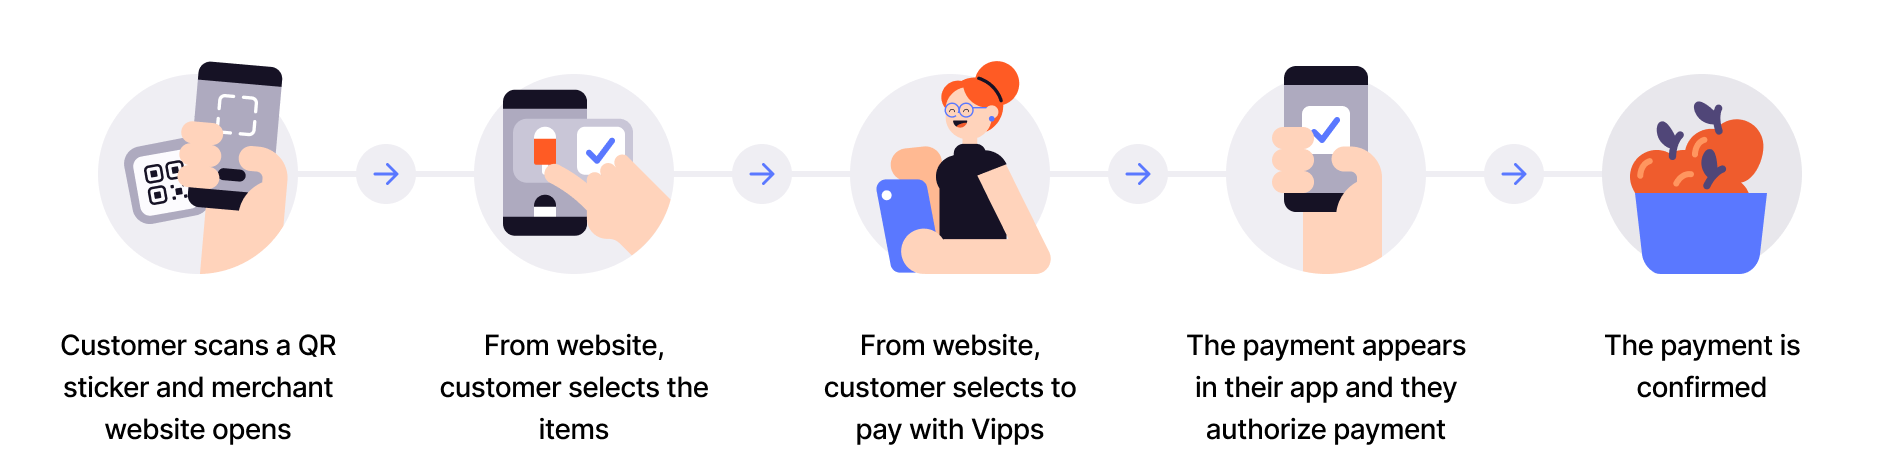
Flow diagram: 5-step QR-to-merchant-site product-selection process. (1) Customer scans a QR sticker and merchant website opens. (2) From the website, customer selects the items. (3) From the website, customer selects to pay with Vipps. (4) The payment appears in their app and they authorize it. (5) The payment is confirmed.
- Create a QR code - Display a Merchant redirect QR code.
- Customer scans QR - Customer scans the static QR code with their phone camera.
- Redirect to website - Customer is taken directly to your website.
- Customer shops - Customer browses your website and selects products.
- Customer initiates payment - Customer chooses to pay with Vipps MobilePay.
- Send payment request - Merchant initiates payment through the ePayment API.
- Customer authorizes - Customer approves payment in their app.
- Capture payment - Confirm the transaction is complete.
View sequence diagram
Static QR directing to the merchant site
- Customer scans the static QR code and is directed to the merchant site.
- Customer selects products on the merchant site.
- Merchant adds the products to the sale.
- Customer selects to pay with Vipps MobilePay.
- Merchant initiates a payment request with order details via the ePayment API.
- ePayment API requests payment from the customer.
- Customer confirms the payment.
- Webhooks API sends the merchant a webhook with the payment authorization status.
- Merchant captures the payment via the ePayment API.
- ePayment API returns the status of the capture.
- Merchant verifies that the POS status matches the capture.
Technical details
Dynamic QR codes (customer-facing screen):
- How to make one-time payment QRs - Visual walkthrough of the customer experience
- How the QR API works with one-time payment - Detailed QR flow with QR API
Personal QR codes (QR scanner):
- How ePayment works in the store - Visual walkthrough of the customer experience
- Personal QR feature - Implementation guide for personal QR payments
Manual entry (POS):
- How ePayment works in the store - Visual walkthrough of the customer experience
Static QR codes (unmanned locations):
- How the QR API works with merchant callback - Visual walkthrough of callback QR flow
- How the QR API works with merchant redirect - Visual walkthrough of redirect QR flow
- Subscribe to
user.checked-in.v1webhook - Receive scan notifications for callback QRs